A fair number of hackers reach that awkward age in their careers – too old for manual pick and place, but too young for a full-fledged PnP machine. The obvious solution is to build your own PnP, which can be as simple as putting a suction cup on the Z-axis of an old 3D-printer. Feeding parts into the pick and place, though, can be a thorny problem.
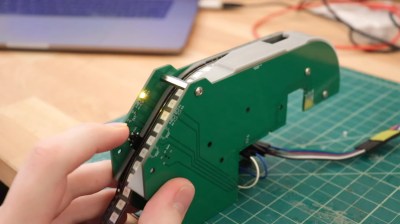
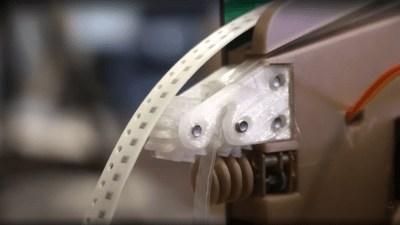
Or not, if you think your way through it like [Phil Lam] did and build these semi-automated SMD tape feeders. Built for 8-mm plastic or paper tapes, the feeders are 3D-printed assemblies that fit into a rack that’s just inside the work envelope of a pick and place machine. Each feeder has a slot in the top for the tape, which is advanced by using the Z-axis of the PnP to depress a lever on the front of the case. A long tongue in the tape slot gradually peels back the tape’s cover to expose a part, which is then picked up by the PnP suction cup. Any machine should work; [Phil] uses his with a LitePlacer. We like the idea that parts stay protected until they’re needed; the satisfyingly clicky lever action is pretty cool too. See it briefly in action in the video below.
It looks like [Phil] built this in support of his popular Ploopy trackball, which is available both as a kit and fully assembled. We think the feeder design is great whether you’re using PnP or not, although here’s a simpler cassette design for purely manual SMD work.
Give your grizzled and cramped hands a break from stuffing boards with surface mount components. This is the job of pick and place machine, and over the years these tools of the trade for Printed Circuit Board Assembly (PCBA) have gotten closer to reality for the home shop; with some models diving below the $10,000 mark. But if you’re not doing it professionally, those are still unobtanium.
The cost of this one, on the other hand, could be explained away as a project in itself. You’re not buying a $450 shop tool, you’re purchasing materials to chase the fever dream of building an open source pick and place machine. There are two major parts here, an X/Y/Z machine tool that can also rotate the vacuum-based parts picker, and the feeders that reel out components to be placed. All of this is working, but there’s still a long road to travel before it becomes a set and forget machine.
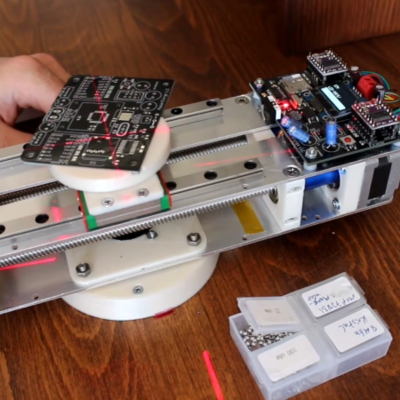
The rubber hits the road in two ways with pick and place machines: the feeders, and the optical placement. The feeders are where [Stephen Hawes] has done a ton of work, all shown in his video series that began back in January. The stackup of PCBs and 3D-prints hangs on the front rail of the gantry assembly, is adjustable for tape widths, and uses an interesting PCB encoder wheel and worm-gear for fine-tuning the feed. [Stephen’s] main controller board, a RAMPS shield for and Arduino Mega that runs a customized version of Marlin, can work with up to 32 of these feeders.
So far it doesn’t look like he’s tackled a vision system, although the Bill of Materials does include “Downwards Camera”, confirming this is a planned feature. Vision is crucial in commercial offerings, with at least one downward camera for precise board positioning, and often an up-facing camera as well to ensure component position and orientation (if not multiple cameras for each purpose). Without these, the machine would be dead reckoning and that can lead to drift over the size of the board and the duration of the placement run as well as axial misalignment. Adding vision shouldn’t be a ground-up effort though, as [Stephen] chose to use OpenPnP to drive the machine and that project already has vision support. This will be much simpler to add when compared to the complexity of the feeders.
[Stephen] admits that much work still needs to be done and he would love to have help dialing in the performance of the feeder design, and fleshing out features on the road to perfection. Although we suspect that as in the early days of bootstrapping 3D printers, a project like this can never be truly finished. At least it’ll make his next run of LED glowties a lot easier to fabricate.
It goes without saying that we love to see all the clever ways people have come up with to populate their printed circuit boards, especially the automated solutions. The idea of manually picking and placing nearly-microscopic components is reason enough to add a pick and place to the shop, but that usually leaves the problem of feeding components to the imagination of the user. And this mass-production-ready passive component feeder is a great example of that kind of imagination.
Almost every design we’ve seen for homebrew PnP component feeders have one of two things in common: they’re 3D-printed, or they’re somewhat complex. Not that those are bad things, but they do raise issues. Printing enough feeders for even a moderately large project would take forever, and the more motors and sensors a feeder has, the greater the chance of a breakdown. [dining-philosopher] solved both these problems with a simple design using only two parts, which can be resin cast. A lever arm is depressed by a plunger that’s attached to the LitePlacer tool, offset just enough so that the suction cup is lined up with the component location on the tape. A pawl in the lower arm moves forward when the tool leaves after picking up the part, engaging with the tape sprocket holes and advancing to the next component.
[dining-philosopher] didn’t attack the cover film peeling problem in his version, choosing to peel it off manually and use a weight to keep it taut and expose the next component. But in a nice example of collaboration, [Jed Smith] added an automatic film peeler to the original design. It complicates things a bit, but the peeler is powered by the advancing tape, so it’s probably worth it.
Hackaday editors Mike Szczys and Elliot Williams explore the coolest hacks of the past 168 hours. The big news this week: will Wink customers pony up $5 a month to turn their lights on and off? There’s a new open source design for a pick and place machine. You may not have a Vectrex gaming console, but there’s a scratch-built board that can turn you oscilloscope into one. And you just can’t miss this LED sign technology that programs every pixel using projection mapping.
Hackaday editors Elliot Williams and Mike Szczys ride the rails of hackerdom, exploring the sweetest hacks of the past week. There’s a dead simple component feeder for a pick and place (or any bench that hand-stuffs SMD), batteries for any accomplished mixologist, and a droid build that’s every bit as cool as its Star Wars origins. Plus we gab about obsolescence in the auto industry, fawn over a frugal microcontroller, and ogle some old iron.
[Erich Styger] owns a Charmhigh CHM-T36VA pick and place machine, which he describes as well-built and a great value of hardware for the money. However, the software end is less impressive, with a proprietary controller that is functional but not great. The good news is that it is possible to retrofit the machine to use the OpenPnP framework, which is open-source and offers more features. Even better, [Erich] has already done and documented all the hard parts!
The CHM-T36VA has two heads, vision system, and uses drag feeders.
The conversion requires upgrading a few hardware parts such as the cameras, replacing the controller’s firmware, then installing and configuring OpenPnP (which runs on an attached PC.)
[Erich] does not recommend this conversion for anyone who is not very familiar with electronics, or has any worries about voiding warranties. Barring that, he suspects the conversion could be done in about a day or two’s worth of focused work. It took him two weeks, including time spent fine-tuning the first production job. He says the bulk of the time was spent on configuration, but he has shared his configuration on GitHub in the hopes that it will save a lot of time for anyone using the same hardware.
After populating some 300 boards and placing over 7000 parts, he’s very happy with the results. The machine places between 600 and 700 parts per hour, so speed might not be amazing but it’s perfectly serviceable. [Erich] finds that while the machine runs a little slower than it did with the original controller, it also runs much smoother and quieter overall. In return he gets what he truly wanted: a pick and place machine whose operation and configuration is entirely open and accessible. You can see it in action in the video, embedded below.
Putting affordable pick and place machines into the hands of hackers and home shops is a huge step towards enabling people to reliably and effectively assemble more than just a handful of boards at a time. There have been some wonderful steps towards that recently, such as these re-imagined component feeders and efforts at making low-cost open source pick and place machines a reality.
Hardly a week goes by without a headline screaming about some asteroid or another making a close approach to Earth; it’s only by reading the fine print that we remember what an astronomer’s definition of “close” means. Still, 2020 being what it is, it pays to stay on top of these things, and when you do the story can get really interesting. Take asteroid 2020 SO, a tiny near-Earth asteroid that was discovered just last week. In a couple of weeks, 2020 SO will be temporarily captured into Earth orbit and come with 50,000 km near the beginning of December. That’s cool and all, but what’s really interesting about this asteroid is that it may not be a rock at all. NASA scientists have reverse-engineered the complex orbit of the object and found that it was in the vicinity of Earth in late 1966. They think it may be a Centaur booster from the Surveyor 2 moon mission, launched in September 1966 in the runup to Apollo. The object will be close enough for spectral analysis of its. surface; if it’s the booster, the titanium dioxide in the white paint should show up loud and clear.
Lasers are sort of forbidden fruit for geeks — you know you can put an eye out with them, and still, when you get your hands on even a low-power laser pointer, it’s hard to resist the urge to shine it where you shouldn’t. That includes into the night sky, which as cool as it looks could be bad news for pilots, and then for you. Luckily, friend of Hackaday Seb Lee-Delisle has figured out a way for you to blast lasers into the night sky to your heart’s content. The project is called Laser Light City and takes place in Seb’s home base of Brighton int he UK on October 1. The interactive installation will have three tall buildings with three powerful lasers mounted on each; a smartphone app will let participants control the direction, shape, and color of each beam. It sounds like a load of fun, so check it out if you’re in the area.
We got an interesting story from a JR Nelis about a quick hack he came up with to help his wife stay connected. The whole post is worth a read, but the short version of the story is that his wife has dementia and is in assisted living. Her landline phone is her social lifeline, but she can’t be trusted with it, lest she makes inappropriate calls. His solution was to modify her favorite cordless phone by modifying the keypad, turning it into a receive-only phone. It’s a sad but touching story, and it may prove useful to others with loved ones in similar situations.
We pay a lot of attention to the history of the early computer scene, but we tend to concentrate on computers that were popular in North America and the UK. But the Anglo-American computers were far from the only game in town, and there’s a new effort afoot to celebrate one of the less well-known but still important pioneer computers: the Galaksija. Aside from having a cool name, the Yugoslavian Z80 computer has a great story that will be told in documentary form, as part of the crowdsourced Galaksija project. The documentary stars our own Voja Antonic, who was key to the computer’s development. In addition to the film, the project seeks to produce a replica of the Galaksija in kit form. Check out the Crowd Supply page and see if it’s something you’re willing to back.
There’s an interesting new podcast out there: the Pick, Place, Podcast. Hosted by Chris Denney and Melissa Hough, it comes out every other week and is dedicated to the electronic assembly industry. They’ve currently got eight episodes in the can ranging from pick and place assembly to parts purchasing to solder paste printing. If you want to learn a little more about PCB assembly, this could be a real asset. Of course don’t forget to make time for our own Hackaday Podcast, where editors Mike and Elliot get together to discuss the week in hardware hacking.
Many of Hackaday’s readers will be no stranger to surface mount electronic components, to the extent that you’ll likely be quite comfortable building your own surface-mount projects. If you have ever built a very large surface-mount project, or had to do a number of the same board though, you’ll have wished that you had access to a pick-and-place machine. These essential components of an electronics assembly line are CNC robots that pick up components from the reels of tape in which they are supplied, and place them in the appropriate orientation in their allotted places on the PCB. They are an object of desire in the hardware hacker community and over the years we’ve seen quite a few home-made examples. Their workings are easy enough to understand, but there is still much to gain by studying them, thus it was very interesting indeed to see a friend acquiring a quantity of surplus Siemens component feeders from an older industrial pick-and-place machine. A perfect opportunity for a teardown then, to see what makes them tick.
Take Me To Your Feeder
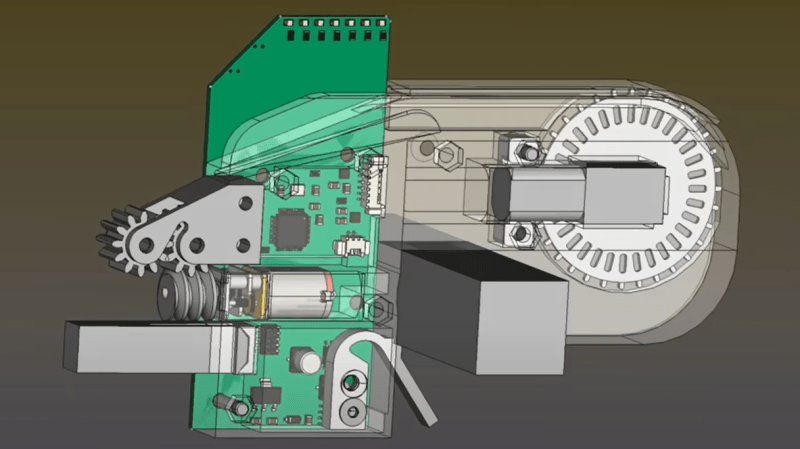
First it’s worth explaining what part a component feeder plays in a pick-and-place machine, and what it does. Components are supplied on flexible tape, sitting in depressions in its surface and covered by a thin plastic cover film that can be peeled back to reveal the part. Using sprocket holes in the edge of the tape, the feeder advances it from one part to the next while peeling back the cover to expose the part. Feeders are usually positioned in a row along the edge of the machine’s work area, such that its head can manoeuvre itself over the part and pick it up before placing it on the board. In the industrial machines this happens very quickly indeed, so the feeders are substantially built to serve many millions of parts over their lifetime.
An annotated overview of the feeder.
The unit is about 45 mm by 20 mm by 100 mm in size, with a very substantial machined aluminium frame upon which its various components are mounted. It holds not one but two feeders for 8 mm tape, one on either side. Turning it on its side, the front half conceals the feed mechanism with the pick-up point at the top, while at the centre is a tensioning system for the peeled-off cover tape. At the rear is a hopper for spent cover tape, accessible via a spring hatch on the back. On the top at the rear are a pair of membrane buttons, to advance or retard the tape.
The component tape enters underneath at the rear and follows a diagonal path upwards to the top, where it engages with a toothed wheel as part of the feed mechanism. The plastic cover tape is peeled back over itself and fed backwards to the tensioning system in the centre, before disappearing into its hopper. There is a solenoid-controlled shutter over the pick-up point, which is presumably opened by the machine as the pick-up head comes over it. The whole thing is designed for easy removal to be loaded with fresh tapes, so its control cables are brought out to an industrial-grade Neutrik connector.
What’s Inside The Box?
The main mechanisms are easily revealed by releasing the screws holding on their outer panels. In the front is the feed mechanism, which takes the form of a sprocket designed to engage with the holes in the tape. This is driven by a worm drive gear from a motor, which also has an optical encoder to sense how far the tape has been advanced or retarded. Above the motor is a solenoid that operates the shutter, a sliding sheet metal assembly on the top of the unit which exposes the pick-up point.
In the centre of the unit is the cover tape tension mechanism. Another motor and sprocket pulls the cover tape past a spring-tensioned roller, that has an optical sensor to feed back its position. The spent cover tape spools into the hopper at the back, from which it can be emptied upon reel changes. The whole machine is controlled by a microcontroller on a narrow PCB in the base of the unit. The guess is that it’s an older Atmel part, but for now it remains covered by a sticker. Communication with the pick-and-place machine is via a serial connection through that Neutrik connector.
What Can You Do With A Surplus Parts Feeder?
It’s been fascinating to take a look inside this feeder, but what can be done with it? In a literal sense that has an obvious answer of feeding parts to a pick-and-place machine, but the real question is: how can it be used? The interface itself is electrically straightforward, it’s a serial port that uses higher voltage differential signalling to compensate for noisy industrial machinery. The question then remains, how can they be driven, and what are the upgrades?
Happily the availability of these units on the surplus market has meant that hackers have had the chance to work on them. My friend pointed me to both a Gcode driver for them and a replacement PCB design, both on GitHub. Being a relatively easy to understand device, coming up with a way to drive them should be well within the abilities of the type of person who’s prepared to build their own pick and place machine.
A pick and place machine need not be impossible to build, but it’s certain that the component feeders are a significant part of their engineering. Maybe this look at one might shed some light on them, and introduce the option of using a surplus unit rather than attempting to build your own.
Surface mount devices were once upon a time considered a huge imposition for the electronics hobbyist. Tiny, difficult to solder by hand, and barely even labelled, many wondered whether the pastime was about to hit a brick wall entirely. Instead, enterprising hackers and makers set about learning new tricks and techniques to work with the technology, and we’ve never looked back since. [Seon] is one such enthusiast, and has built a useful turntable for making manually picking and placing boards easier. (Video, embedded below.)
The design is something [Seon] has refined gradually over time, having built two initial versions of the turntable before finally feeling ready to do a wider public release with version 3. It consists of a rotating caddy that has radial slots that hold all the tiny SMD parts, that can be labelled for easy parts identification. There’s also an acrylic window that ensures only one segment of the caddy is open at a time, to avoid accidentally dropping similar, tiny looking parts into adjacent slots – a big improvement over the first design. There’s then a smaller rotating central pad upon which a PCB can be placed, ready to receive parts.
Well, that was quite a show! The Perseverance rover arrived on Mars Thursday. Don’t tell the boss, but we spent the afternoon watching the coverage in the house on the big TV rather than slaving away in the office. It was worth it; for someone who grew up watching Jules Bergman and Frank Reynolds cover the Apollo program and the sometimes cheesy animations provided by NASA, the current coverage is pretty intense. A replay of the coverage is available – skip to about the 1:15:00 mark to avoid all the filler and fluff preceding the “Seven Minutes of Terror” main event. And not only did they safely deliver the package, but they absolutely nailed the landing. Perseverance is only about 2 km away from the ancient river delta it was sent to explore for signs of life. Nice shooting!
We’re also being treated to early images from Jezero crater. The first lowish-rez shots, from the fore and after hazard cameras, popped up just a few seconds after landing — the dust hadn’t even settled yet! Some wags complained about the image quality, apparently without thinking that the really good camera gear was stowed away and a couple of quick check images with engineering cameras would be a good idea while the rover still had contact with the Mars Reconnaissance Orbiter. Speaking of which, the HiRISE camera on the MRO managed to catch a stunning view of Perseverance’s descent under its parachute; the taking of that photo is an engineering feat all by itself. But all of this pales in comparison to a shot from one of the down-looking cameras in the descent stage, show Perseverance dangling from the skycrane just before touchdown. It was a really good day for engineering.
Would that our Earthly supply chains were as well-engineered as our Martian delivery systems. We’ve been hearing of issues all along the electronics supply chain, impacting a wide range of industries. Some of the problems are related to COVID-19, which has sickened workers staffing production and shipping lines. Some, though, like a fire at the AKM semiconductor plant in Japan, have introduced another pinch point in an already strained system. The fire was in October, but the impact on the manufacturer depending on the plant’s large-scale integration (LSI) and temperature-compensated crystal oscillators (TCXO) products is only just now being felt in the amateur radio market. The impact is likely not limited to that market, though — TCXOs pop up lots of gear, and the AKM plant made LSI chips for all kinds of applications.
What do you get when you combine a 3D-printer, a laser cutter, a CNC router, and a pick-and-place robot? Drones that fly right off the build plate, apparently. Aptly enough, it’s called LaserFactory, and it comes from MITs Computer Science and Artificial Intelligence Lab. By making different “bolt-on” tools for a laser cutter, the CSAIL team has combined multiple next-generation manufacturing methods in one platform. The video below shows a drone frame being laser-cut from acrylic, to which conductive silver paste is added by an extruder. A pick-and-place head puts components on the silver goo, solders everything together with a laser, and away it goes. They also show off ways of building up 3D structures, both by stacking up flat pieces of acrylic and by cutting and bending acrylic in situ. It’s obviously still just a proof of concept, but we really like the ideas presented here.
And finally, as proof that astronomers can both admit when they’re wrong and have fun while doing so, the most remote object in the Solar System has finally received a name. The object, a 400-km diameter object in a highly elliptical orbit that takes it from inside the orbit of Neptune to as far as 175 astronomical units (AU) from the Sun, is officially known as 2018 AG37. Having whimsically dubbed the previous furthest-known object “Farout,” astronomers kept with the theme and named its wayward sister “Farfarout.” Given the rapid gains in technology, chances are good that Farfarout won’t stay the Sun’s remotest outpost for long, and we fear the (Far)nout trend will eventually collapse under its own weight. We therefore modestly propose a more sensible naming scheme, perhaps something along the lines of “Farthest McFaraway.” It may not scale well, but at least it’s stupid.
Open source pick and place machines have come a long way in the past years, but are not necessarily worth the setup time and machine cost if you are only building a few PCBs at a time. [Nuri Erginer] found himself in this situation regularly, so he created PnPAssist, a “smart” build platform to speed up manual PCB assembly. Video after the break.
The PnP assist consists of a small circular platform that can automatically translate and rotate to place the current footprint in the middle of the platform, right in the center of your microscope’s view, and a laser crosshair. The entire device can also rotate freely on its base to avoid contorting your arm to match the footprint orientation. Just export the PnP file from your favorite PCB design software, load it on a micro SD card, plug it into the PnPAssist, and start assembling. The relevant component information is displayed on a small OLED display right on the machine. [Nuri] has also created a component organizing tray that will indicate the correct compartment with an RGB LED.
Below the build platform, a 3D printed gear is in contact with a pair of parallel lead screws driven by stepper motors. The relative motion of the lead screws allows the platform to rotate, translate, or both. This arrangement also means the machine is a lot more compact than a conventional XY-table and can be packed away when not in use. The base is held firmly in place on the workbench with a set of suction cups or screws. Power is provided through the fixed base using a slip-ring, so there are no cables to twist up as you spin the machine around.
We can certainly see this machine being a massive help on any small electronics assembly job, especially considering the fast setup time and relative simplicity. It will also work well with the 3D printed component dispensers or component turntable we featured in the past.
This week we saw a couple DIY tools for small-run manufacturing at home that help make your life easier if you’re climbing out of the happy bucket and into the pit of despair — when you’re making enough of the item that it’s not fun any more, but you still don’t have the volume to leave the manufacturing to someone else.
The first was an automatic through-hole soldering machine made from a 3D printer. This actually makes sense even if you’re getting boards assembled for you, because through-hole pads are a lot more expensive than SMT parts, and they usually charge per pin. Put a 2×20 pin header on your project, and it can end up costing a lot. Or you can robotificate the solution.
This week’s second solution really caught my eye. PnPassist is machine that turns your PCB around, locates a laser crosshair over the next SMT piece that you need to place, and even has an OLED screen that tells you what to put there. There are many great mechanical design choices here, but what really drew my attention is how well this machine fills a gap between manual and fully automatic pick-and-place.
I know you hate looking back and forth between the board and the schematic or parts list, trying to find just where Q23 is on the darn board, or looking up resistor values. With PnPassist, you still have to do the placing, but with machine guidance. If you don’t have the money or the space for a fully automatic PnP, this is an obvious win, but also for short runs when loading up the reels takes more time than populating the board, this could be a huge win.
I love this kind of human-capability-enhancing machine, and I’m always happy to see a design like this. It reminds me of the very clever Shaper Origin, or even just this handy automatic XY table for drilling many precise holes. In all these cases, there’s some part of the problem that would be hard to solve, require extremely bulky or expensive machinery, or can just be more simply accomplished by a meatbag. But combining machine precision with the human element produces something more than the sum of the parts.
What’s your favorite human-enhancing tool?
This article is part of the Hackaday.com newsletter, delivered every seven days for each of the last 200+ weeks. It also includes our favorite articles from the last seven days that you can see on the web version of the newsletter.
Want this type of article to hit your inbox every Friday morning? You should sign up!
You’ve finally decided to take the plunge and build a board with surface-mount parts. After carefully dispensing the solder paste with a syringe, it’s time to place the parts. You take up your trusty tweezers and reach to grab a SOIC-14 logic IC—only there’s not a great way to grab it. The IC is too long to grab one way and has leads obstructing the other. You work around the leads, drop the IC into place, and then pick up an 0402 resistor. You gently set the resistor into your perfectly dispensed solder paste, pull the tweezers away, and the resistor has stuck to your slightly magnetic tweezers. [Robin Reiter] realized that hobbyists and small manufacturers needed a better way to assemble their surface-mount designs, so he’s building the Pixel Pump Pick & Place, an open-source vacuum assembly tool.
Vacuum assembly tools use a blunt-tipped needle and suction to pick up surface-mount parts. Pressing an attached foot pedal disables the vacuum, allowing the part to be gently released. [Robin] thought to include a few thoughtful features to make the Pixel Pump even more useful. It has adjustable suction presets and a self-cleaning feature to blow out any solder paste you accidentally suck up. Most of the non-electronic parts are 3D printed, and [Robin] intends to make the entire design open-source.
We love it when an Open Source hardware project grows up and turns into a sustainable business, bootstrapped with nothing but hard work and great ideas, but it’s a really tough prospect to do it using your own money, ploughing the profits from any sales back into development and not taking a dime in wages whilst you do so. People obviously need an income to live off, and that time spent working on a startup is time you can’t spend earning your keep. So it’s with great pleasure that we can bring you the latest news from [Stephen Hawes] and his pick-and-place machine plans. In the year since we last checked in with the project, development has continued at a steady pace, with the guys quickly outgrowing the garage workspace, whilst they prepare PnP machine kits ready for sale.
The big news is that [Joel Spolsky], co-founder of Stack Exchange, creator of Kanban management tool, Trello, and angel investor, has made a sizable ($100K USD) investment in the company which has allowed them to take on a 3,000+ sq. ft office space, and given them the funds for stock and all that boring business overhead stuff. [Stephen] takes time to explain that [Joel] will not have any control of the company, and all hardware and software will remain fully Open Source. For those interested [Joel] implemented his investment as a SAFE note (Simple Agreement for Future Equity) and as such, [Joel] will only make a return in the form of a small share allocation, if they hit the big-time in the future. Can’t really say fairer than that!
[Stephen] did recently receive a ‘cease and desist’ notice regarding his use of the ‘Index’ name for the project, since that is already a trademarked term, defended by somebody else, the project will need change name very soon. A minor setback, but it is a bit annoying that a chunk of that investment now has to go to a lawyer to make sure that the name they do eventually choose isn’t already taken and is safe to use.
In terms of the machine itself, it is now is fully operating, with multiple automatic tape feeders, featuring up and down-facing machine vision, and all that OpenPnP goodness. It has even been demonstrated placing parts for its own custom motherboard PCB, reprap style. Nice!
We wish [Stephen] and partner [Lucian] all the success they deserve, and hope they get those kits out there, because there are people around these parts that need an affordable, hackable, desktop PnP machine ASAP, this scribe included!
We in the hacker trade are pretty used to miracles — we make them all the time. But even the most jaded among us has to admit that modern PCB assembly, where components that could easily hide under a grain of sand are handled by robots, borders on witchcraft. The pick and place machines that work these wonders not only have to hit their marks accurately and precisely, but they also do it at blinding speeds and for days on end.
Luckily, even those of us who design circuits for a living and depend on PCB assembly services to realize those designs can, at least to some degree, abstract the details of the pick and place phase of the process away. But making it “just work” isn’t a trivial task, and learning a little bit about what it takes to do so can make us better designers. Plus, it’s just plain cool to watch a pick and place do its thing. And to dive a little deeper into pick and place, Chris Denney, CTO of Worthington Assembly and co-host of “Pick, Place, Podcast” will stop by the Hack Chat. If you’ve ever wondered about the inner workings of PCB assembly and the role pick and place plays in it, or if you’re looking for tips on how to optimize your layouts for pick and place, this is one you won’t want to miss!
These days we’ve got powerful free tools to do CAD and circuit design, cheap desktop 3D printers that can knock out bespoke enclosures, and convenient services that will spin up a stack of your PCBs and send them hurtling towards your front door for far less than anyone could have imagined. In short, if you want to build your own professional-looking gadgets, the only limit is your time and ambition. Well, assuming you only want to build a few of them, anyway.
Once you start adding some zeros to the number of units you’re looking to produce, hand assembling PCBs quickly becomes a non-starter. Enter the pick and place machine. This wonder of modern technology can drop all those microscopic components on your board in a fraction of the time it would take a human, and never needs to take a bathroom break. This week Chris Denney stopped by the Hack Chat to talk about these incredible machines and all the minutiae of turning your circuit board design into a finished product.
Chris is the Chief Technology Officer (CTO) of Worthington Assembly, a quick turn electronics manufacturer in South Deerfield, Massachusetts that has been building and shipping custom circuit boards since 1974. He knows a thing or two about PCB production, and looking to help junior and mid-level engineers create easier to manufacture designs, he started the “Pick, Place, Podcast” when COVID hit and in-person tours of the facility were no longer possible. Now he says he can tell when a board comes from a regular listener by how many of his tips make it into the design.
So what should you be doing to make sure your board assembly goes as smoothly as possible? Chris says a lot of it is pretty common sense stuff, like including clear polarity indicators, having a legible silkscreen, and the use of fiducial markers. But some of the tips might come as something of a surprise, such as his advice to stick with the classic green solder mask. While modern board houses might let you select from a rainbow of colors, the fact is that green is what most equipment has been historically designed to work with.
That black PCB might look slick, but can confuse older pick and place machines or conveyors which were designed with the reflectivity of the classic green PCB in mind. It also makes automated optical inspection (AOI) much more difficult, especially with smaller component packages. That said, other colors such as white and red are less of a problem and often just require some fine tuning of the equipment.
He also pulled back the curtain a bit on how the contract manufacturing (CM) world works. While many might have the impression that the PCB game has moved overseas, Chris says orders of less than 10,000 units are still largely handheld by domestic CMs to minimize turnaround time. He also notes that many assembly houses are supported almost entirely by a few key accounts, so while they may be juggling 50 customers, there’s usually just two or three “big fish” that provide 80% of their business. With such a tight-knit group, he cautions CMs can be a bit selective; so if a customer is difficult to work with they can easily find themselves on the short end of the stick.
While the Hack Chat is officially only scheduled for an hour, Chris hung out for closer to three, chatting with community members about everything and anything to do with electronic design and production. His knowledge and passion for the subject was readily apparent, and we’re glad he was able to make time in his schedule to join us.
The Hack Chat is a weekly online chat session hosted by leading experts from all corners of the hardware hacking universe. It’s a great way for hackers connect in a fun and informal way, but if you can’t make it live, these overview posts as well as the transcripts posted to Hackaday.io make sure you don’t miss out.
Anyone who’s ever assembled a PCB full of tiny SMD parts will have found that tweezers are not always the best tool when it comes to accurate positioning. Thin, flat components like microcontrollers can be awkward to pick up securely, while small resistors and capacitors have a tendency of snapping out of your tweezers’ grip and flying off into the sunset (or your carpet). Vacuum pickup tools can be a great help, but the most convenient models, with an electric air pump and a foot switch, can be a bit expensive. [sjm4306] shows that it doesn’t have to be that way: he built his “VacPen” mostly from reused components.
At the heart of the project is a little vacuum pump with a pen-like device hooked up to it through a flexible hose. The tip of the pen holds a pickup nozzle that came from a cheap manual pick and place tool. Both the pump and pen were salvaged from some gas analysis instrument that [sjm4306] tore apart a long time ago; the pen is especially convenient since it comes with a built-in brush-like filter that can trap any debris or tiny parts that might be accidentally swallowed.
The VacPen controller is housed inside a neat 3D printed enclosure that holds a custom PCB with an ATtiny microcontroller. The pump can be operated either through a foot switch, or by pressing on the touch-sensitive pad on top of the enclosure. [sjm4306] made this by soldering a wire to a copper penny and sticking it on the inside of the lid: simple, effective and cheap.
As you can see in the video embedded below, the VacPen is perfectly capable of picking up any kind of SMD component, and just as importantly, immediately releasing it at the desired moment. If you’re new to SMD technology, we can recommend this tutorial by [Bil Herd] that covers vacuum tweezers as well. If you’re more into automating vacuum pickup tools, this cool robot might be of your interest.
Many of the hardware orientated hackers among us will likely have been following along with the story of [Stephen Hawes] and the Lumen pick-and-place project but kind of waiting a bit for the project to mature some more before maybe taking the plunge and ordering a kit. One reason for this might be that whilst the basic machine design is there and working, the tape feeders did need a fair bit of work, and a lack of usable feeders does not make a great PnP machine. [Stephen] has been working on a newer design that addresses some of the identified shortcomings, and has started documenting his progress (video, embedded below) along the way.
Gone is the PCB-based ‘case’, reverting back to a 3D printable affair and a much smaller PCB. After flip-flopping a bit between different geared DC motors, [Stephen] settled back on the original, smaller unit, which after a wee spot of hacking, was convinced to accept an optical encoder stripped from another unit, and this proved that it was indeed more than up to the tape-advancement duty. The reason for this change was physical size — the original motor resulted in an assembly 38mm wide — this limited the number for feeders on the front rail to barely eleven units. This is not really enough, but with the narrower assembly, the width is reduced to 15.5mm allowing 27 feeders to snuggle together on the rail, and that should make the machine much more usable.
Another area of concern was the cover tape peeler. It is critical that as the tape advances, for each picking operation, the cover film is peeled back at the correct rate, with sufficient tension to overcome any extra sticky areas of glue holding it down. The original design used a separate motor to wind the film around a spool, but again that spool was quite wide, and a narrower solution was needed. This was improved by feeding the film into a pair of opposed straight gears, driven from one side by a worm gear. The film is peeled off on one side, passed through a guide groove in the feeder body and then onwards to the puller mechanism. Simple and effective.
One final area for concern was that the mounting method of the feeder unit onto the front rail (which looks like a length of 2020 extrusion) was a bit wobbly, allowing movement in a few directions, and that’s not great for repeatable picking, even with the awesome OpenPNP vision system dialling it in as best it can. The redesigned enclosure is shaped to the rail profile, allowing it to fit tighter and is retained under tension with a replaceable 3D printed flexure. A quick ‘snap’ and it now locks in place under tension and the wobble is history.
We’ve obviously covered the LumenPnP recently, and here, a little earlier and we’re not going to end the story just yet. The machine is now starting to look a lot more viable for those of us who do a lot of PCB assembly runs in small quantity, and we’ll sure be watching progress closely in the coming months!
When working with grain-of-dust surface-mount components, one of the tools which makes a huge difference is a vacuum pickup pen. Instead of trying to move the part with tweezers and succeeding only in flicking it into the middle distance, a tiny rubber suction cup with a vacuum feed allows you to pick it up and place it exactly where it is required. Unfortunately, good vacuum pickup tools come at a price, and very cheap ones aren’t worth the expenditure.
This is where [TDG (Béla)]’s SMD vacuum pickup tool comes in. The problem with the cheap tools is only that their manual vacuum is ineffectual, they come with the required array of probes with the suction cups. The solution is to take a small vacuum pump with a low voltage motor and attach it with a 3D printed adapter to the business end of a cheap vacuum tool and make a useful tool the result.
There’s a short video of the tool in action that we’ve placed below the break. It’s a bit noisy, but it’s obvious that it performs well. Control is via an air hole in the side of the 3D print, place a finger over it and the full suction is directed to the tip. The result is simpler and cheaper than previous contenders in the budget vacuum pickup stakes.
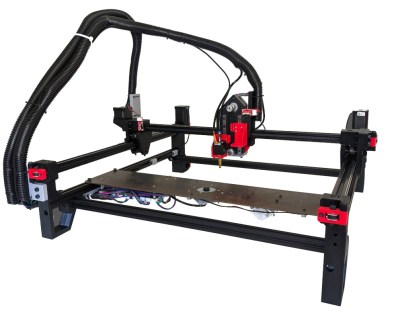
Pick and place machines are a wonder to behold, as they delicately and accurately place part after part. Unfortunately, they have to have a similarly wondrous price tag. Luckily, they aren’t too difficult to make yourself as they share many properties of a 3D printer with some extra constraints. [Stargirl Flowers] released Starfish, an open-source pick-and-place control board based around an RP2040 to help people make their own.
She purchased a LumenPnP, and the itch to tinker became too much to ignore. The STM32 on the stock controller also happened to get fried, leaving an obvious opening to create a custom board. [Stargirl] chose Trinamic TMC2209 motor controllers to drive the three stepper motors. The power circuit is impressively overbuilt with a 3A fuse, a TVS diode for shunting voltage spikes, a P-channel MOSFET for reverse polarity protection, a low-pass filter for AC ripple, and a large 100μF capacitor.
The RP2040 is a good choice since it’s easy to get and has plenty of digital I/O. USB connects the board to the outside work and includes ESD TVS diodes to protect the board when connecting and disconnecting the USB port. Motors for vacuums are controlled by a 74HC2G34 buffer that drives enable lines to two MOSFETs. Solenoids are similar but with a high current peak and a much smaller current to keep them open. The DRV120 fits the bill as it is a single-channel relay with current regulation. I2C vacuum sensors are the same ones on the Lumen motherboard; they just required an I2C multiplexer.
It’s an extremely well-documented project explaining why each part was chosen and why. If you want to create an RP2040 project that needs to last, we consider this a guiding star. It’s all up on GitHub for you to take a look at.


 operation, the cover film is peeled back at the correct rate, with sufficient tension to overcome any extra sticky areas of glue holding it down. The original design used a separate motor to wind the film around a spool, but again that spool was quite wide, and a narrower solution was needed. This was improved by feeding the film into a pair of opposed straight gears, driven from one side by a worm gear. The film is peeled off on one side, passed through a guide groove in the feeder body and then onwards to the puller mechanism. Simple and effective.
