Quantcast
Channel: pick and place – Hackaday
Viewing all 66 articles
Browse latest View live

Humble Beginnings of a Pick and Place Machine

$
0
0

beginnings

[Pete's] invented a product called an AIR Patch Cable designed to interface with an airplane’s intercom, and is looking to manufacture and assemble them himself — unfortunately, the circuit boards are tiny, and SMD components aren’t exactly the easiest to install. So he decided to build a pick and place machine to do it for him!

It’s not finished yet, but [Pete] has reached a major milestone — he’s finished the base CNC machine aspect of it. He opted for a kit build for the major mechanical components, the Shapeoko 2 — its a solid design and if you decided to make something from scratch it’d probably cost much more and take a lot longer.

From there he began selecting his electronics individually. He’s chosen the Big Easy Driver by Sparkfun to control his stepper motors, which supports a maximum size of NEMA 17 steppers, so he bought five of those too. To control it all, he’s using LinuxCNC which is an excellent choice — and if you’re not crazy about Linux, you can actually download Ubuntu 10.04 with LinuxCNC pre-installed for you to make it super easy — you’ll just need an old dedicated PC to use.

Once everything was setup, he wrote a quick program to control his future pick and place machine — he strapped a pen onto the Z-axis and it scratched out its first word: “Gangsta”. Cause you know, G-Code. Right? Yeah. Anyway, we’re quite excited to see how this progresses.

To see a pick & place machine that’s already functioning, check out this beautiful piece of work!


Filed under: cnc hacks

THP Entry: A $300 Pick & Place 3D Printer

$
0
0

pnp

With the advent of cheap PCB fabrication, (relatively) easy to use layout tools, and a whole host of prototypes for nearly any device imaginable, the age of custom circuits is upon us. The tools to make these custom circuits, though, are usually hilariously expensive or simply unavailable to all but the most resourceful hackerspace. It would be great if every workshop in the country had a pick and place machine, and the $300 Pick and Place / 3D printer would be a great way to introduce this tech to millions of electronic tinkerers around the world. It also makes for a great entry to The Hackaday Prize.

The basic design of this machine is a delta bot. This is a wonderful choice over a Cartesian bot; deltas are faster and can have higher acceleration, a great thing to have if you want to throw together a few boards quickly. Although the configuration looks a little inverted as compared to other 3D printer delta bots, there’s a reason for this: the design was simulated with evolutionary algorithms and statistical tests to find the best geometry for the machine. The completed machine should be able to place 0201 components; anything smaller would be called dust.

The software hits all the marks, using OpenCV for image processing, ARM boards for motor control and computational tasks, and a good bit of mechanical and pneumatic work to suck up the parts. They’re even working on a 3D printed tape feeders. Now a component often overlooked when looking at the total cost of pick and place equipment is essentially free.

It’s awesome work, and even if they don’t win The Hackaday Prize, it’s still something every hackerspace should have. Now if someone would only crack the through-hole plating problem…


SpaceWrencherThe project featured in this post is an entry in The Hackaday Prize. Build something awesome and win a trip to space or hundreds of other prizes.


Filed under: The Hackaday Prize

3D Printed Trays for your Pick and Place Machine

$
0
0

3dprintedPNPTray Pick and Place machines are one of the double-edged swords of electronics.They build your boards fast, but if you don’t have everything setup perfectly, they’ll quickly make a mess. A pick and place can’t grab a resistor from a pile and place it – so far only humans can pull that one off. They need parts organized and oriented in reels or trays.

[Parker Dillmann] had to load some parts, but didn’t have a tray for them, so he 3D printed his own. [Parker] works at a small assembly house in Texas. He’s working on a top secret design which includes FFC connectors. Unfortunately, the connectors shipped in pick and place unfriendly tubes rather than reels. If he couldn’t find a tray, [Parker] would have to hand place those connectors as a second operation, which would increase the time to build each board and leave more chances for mistakes.

Rather than place each part by hand, [Parker] got in touch with his friend [Chris Kraft] who is something of a 3D printing guru. [Chris] confirmed that a 3D printed tray would be possible, though the PLA he prints with was not static safe. That was fine for the connectors, but [Parker] was hoping to save some tray space by putting his PSOC4 chips in the printed tray as well.

[Parker] used SketchUp to design a tray that would fit his Madell DP2006-2 pick and place. He left .15mm clearance around the parts – just enough to cover any inaccuracies during printing, but not enough to throw off parts placement. He sent the STL file over to [Chris] who used Simplify3D to a create a Gcode file. [Chris] printed the tray at .2 mm layer height on his MakerGear M2 printer, and the results looked great. Would they be good enough for the pick and place machine?

[Parker] received the printed trays in the mail and loaded them with parts. The pick and place had no problem finding and placing the connectors, making this job a huge success. [Parker] even left room for the PSOC4 chips.He plans to paint the tray with anti-static paint before giving them at try.

We really like this story – it’s a perfect example of how 3D printers can speed up processes in manufacturing. Now that the basic design is done, creating new trays is a snap. Nice work [Parker] and [Chris]!


Filed under: 3d Printer hacks

Hacklet #4 — PCB Tools and Wristwatches

$
0
0

4

The Hackaday Prize is heating up! When we set up the prize, we expected to see some incredible entries, and you guys haven’t let us down. Projects like SatNOGS, which aims to create a global network of satellite ground stations, or OpenMV, a low-cost Python powered vision module, are seriously blowing us away.

We’re starting to give away some prizes through community voting and there’s still plenty of time for you to enter. Check out The Hackaday Prize page for the full details.

Low Cost Printed Circuit Board Tools

Pick and Place

We’ve seen mills, lathes, CNC machines and 3D printers, but if there is any device that gets a hardware hacker’s attention, it’s a pick and place machine. In the PCB industry these machines pick up thousands of parts every hour, perfectly placing them on printed circuit boards. The downside is they’re incredibly expensive. The cheapest Chinese machines without vision start in the $4000 USD price range.

[Neil] aims to break down those price barriers with a $300 Pick and Place Machine that doubles as a 3D printer. He’s using delta 3D printer hardware to do it, and he’s throwing in everything! OpenCV based vision, multiple tool heads, reel and tray pick up, [Neil] has covered all the major points. He can’t do it alone though, so he’s looking for help. Check it out, and give him a hand (or a skull)!
pcbMill

A low-cost pick and place machine will need printed circuit boards to work on. Not to worry, [shlonkin] has you covered with his PCB mill for under $10. Built from recycled printers, an Arduino, and host software written in processing, [shlonkin] has already posted impressive photos of boards his machine has milled. The main problem [shlonkin] has run into is longevity with plastic parts. In his most recent update, he’s looking for ideas. Can you help him?

Digital Watches

Anyone will tell you that digital watches are a pretty neat idea. With the era of smartwatches upon us, more than one hacker has delved into building their own timepiece. We’re happy to report that most of them even tell time.

walltech[Walltech] has gone all out to create the ultimate watch. His OLED Smart Watch 6.0 is the culmination of years of work. The watch features a 1.5” OLED display, an SD card slot, and a vibrator motor. It has Bluetooth 4.0 to connect to the world, and an Atmel ATmega32u4 as its brain. A 500mAh battery will power the watch for 18-24 hours per charge.

[Walltech] plans to make it do everything from SMS and email notifications to music streaming. Don’t see a feature you want? Add it! Smart Watch 6.0 Is completely open source, so you can hop into the code and hack away!

tilttouchtime2On the other side of the spectrum is [askoog89’s] Tilt Touch Time, which utilizes  those awesome bubble LED displays some of us remember from the 70’s. The retro look is only 3D printed skin deep though, as [askoog89] is using an ATtiny2313 processor. Atmel’s Qtouch is providing the capacitive touch sensing, while a tilt sensor helps Tilt Touch Time live up to its name. [Askoog89] has submitted his watch to The Hackaday Prize, so he’s trying to figure out a way to use the touch sensor to sync time with a PC. If that doesn’t work out, we bet those bubble LEDs would make great light sensors for some monitor-blink-sync action.

Fallout fans have seen plenty of PIP boys here on Hackaday, but have you seen [jara's] PIP Watch? This Personal Information Panel is going big on size but low on power with a 3 inch e-ink display. [Jara] is using an STM32F101 ARM Cortex-M3 CPU, so he’s got plenty of processing power at his disposal. He’s connecting to the world through a Bluetooth serial link. All he needs is a Geiger counter, and he’s good to go!

pipWatch

That’s it for this week’s Hacklet, stay tuned for next week when we bring you more of what’s happening at Hackaday.io!


Filed under: Hackaday Columns

THP Semifinalist: Retro Populator, A Pick And Place Retrofit For A 3D Printer

$
0
0

retro

A huge theme of The Hackaday Prize entries is making assembly of electronics projects easier. This has come in the form of soldering robots, and of course pick and place machines. One of the best we’ve seen is the Retro Populator, a project by [Eric], [Charles], [Adam], and [Rob], members of the Toronto Hacklab. It’s a machine that places electronic components on a PCB with the help of a 3D printer

The Retro Populator consists of two major parts: the toolhead consists of a needle and vacuum pump for picking up those tiny surface mount parts. This is attaches to a quick mount bolted right to the extruder of a 3D printer. The fixture board attaches to the bed of a 3D printer and includes tape rails, cam locks, and locking arms for holding parts and boards down firmly.

The current version of the Retro Populator, with its acrylic base and vacuum pen, is starting to work well. The future plans include tape feeders, a ‘position confirm’ ability, and eventually part rotation. It’s a very cool device, and the ability to produce a few dozen prototypes in an hour would be a boon for hackerspaces the world over.

You can check out a few videos of the Retro Populator below.


SpaceWrencherThe project featured in this post is a semifinalist in The Hackaday Prize. 


Filed under: 3d Printer hacks, tool hacks

Pick and Place Machines at Maker Faire

$
0
0

A few years ago, every booth at a Maker Faire had a 3D printer. It didn’t matter if 3D printing was only tangental to the business, or even if the printer worked. 3D printers have finally jumped the shark, and there’s going to be an awesome t-shirt to reflect this fact. This year there weren’t many 3D printers, leaving us asking ourselves what the new hotness is.

Pick and place machines. We couldn’t find many at the faire, and only Carbide Labs’ Pick and Paste machine was working on picking up small resistors and LEDs the entire faire. Carbide’s Pick and Paste machine is exactly what you would expect in a pick and place machine: it picks up components out of tapes and wells, orients them correctly, and plops them down on a board.

The killer feature for the Pick and Paste is its modular design. The toolhead is expandable, allowing anyone to add a second vacuum nozzle to double the rate parts are placed, or a solder paste dispenser. The guys didn’t have the paste dispenser working for the fair (leaded solder and kids don’t mix), but this machine is effectively a combination pick and place machine and solder paste dispenser, something that’s usually two machines on an assembly line.

Also at the faire was Tempo Automation. They’re in a pseudo-stealth mode right now, waiting until everything works perfectly until bringing their machine to the masses. It is, however, exceptionally fast and about a third of the price of a similar machine.

The only other pick and place machine at the faire was the Firepick Delta, one of the more popular projects on hackaday.io and one of fifty finalists for the Hackaday Prize. Unfortunately, the FirePick Delta was broken in shipping, and although [Neil] was sitting right next to the 3D printing guys, it would have taken all weekend to repair the machine.


Filed under: tool hacks

THP Hacker Bio: Neil Jansen

$
0
0

neil

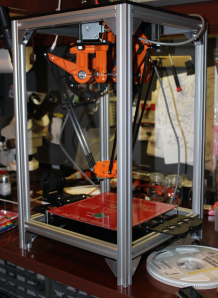
If we were running a contest to give away a trip to space for building the most innovative open hardware project a few years ago, the winner would inevitably be a 3D printer. Times have changed, 3D printing is reaching the limits of what can be done with simple plastic extrusion, and there are new hardware challenges to be conquered. One of the challenges facing hardware designers is the ability to create and assemble electronic circuits quickly. For that, there are a few pick and place machines being developed, the lowest cost being the FirePick Delta. It sells itself as a $300 pick and place machine borrowing heavily from the RepRap project, enabling tinkerers and engineers to assemble PCBs quickly.

[Neil Jansen] is the project lead for the FirePick Delta, and along with team members ranging from software developers in the bay area, to electronics technicians and high school students, they’ve created what will become the lowest cost and most capable pick and place machine available. Already the machine has tape feeders, tray feeders, a vision system, and modules to dispense solder paste. It’s an astonishing accomplishment, and were it not for some damage in shipping, we would have a video of [Neil] demoing the FirePick at Maker Faire NY.

In lieu of that, we do have a bio on [Neil] and what challenges he’s faced in building the FirePick. You can read that below, or check out their second demo video for The Hackaday Prize:

Robotics, and Extreme Circuit Boarding.  The world does not yet recognize Extreme Circuit Boarding as a sport.  But it basically consists of consuming large amounts of Red Bull, listening to loud Dubstep and Electro music, and designing crazy circuits, and then building them as quickly as possible when the boards and parts arrive. It’s extreme because you have to get the designs right on the first rev, with no rework.  Kind of in the spirit of a hackathon or a Tattoo Inkmaster reality show.  Since no one knows about this sport yet, I’m the unofficial world champion for 2014.

Aerospace, GPS / GNSS receivers, radios, autopilots, transponders, and collision avoidance systems, blah blah blah…  My job is the hardware/software testing and verification of these boxes.  These days I mostly write software, but at my last job, on a typical day, I’d be doing CAD in SolidWorks, schematic capture and pcb layout, writing embedded code, wiring test jigs and harnesses, requirements capture, and lots of other stuff.  I only have a high school background, everything else is self-taught.  Even though it’s a big stuffy company, I still get to do lots of different things, which keeps me happy.  Our other team members have day jobs as well. Karl Lew works as a full stack software developer in Bay Area, California. Christian Lerche is an electronics technician in Denmark and works in a lab that works on locomotive electronics. Dayton Pid is our youngest member at 16 and is in high school.  And Thomas Kilbride is in college at Indiana University.

My passion is basically the pursuit of reality through objectivism, critical thinking, and logic, and the propagation of those ideas leading by example, living by principles, appreciating the beauty of life, and taking personal accountability for my actions.

That honor almost went to my 2009 model MacBook Unibody recently.  I have been using it as my main development platform for our Hackaday project, mostly while dual-booted into Windows 7. It’s extremely slow, sometimes requiring a few minutes to switch between different apps.  It was maxed out at 4GB of RAM, and of course, every time I needed to dual-boot back to OSX to do photo editing or whatever, that was time lost.  The battery has been dead for almost two years, so it’s pretty much anchored to the desk.  I was almost about to take it out back and destroy it office-space style, while playing the obligatory “Still” from the Geto Boys from iTunes until it wouldn’t play any more.  But instead, I hobbled together a new PC out of pieces I had lying around, and a new motherboard, CPU, and 16 GB of RAM.  My productivity towards the HaD project since has probably tripled since I’ve gotten that taken care of.

I’m OS agnostic for the most part.  On a typical day, I’m using Windows, OS X, BSD, Linux (both desktop and embedded), and occasionally esoteric RTOS platforms.  I’m forced to run Windows for CAD, but it’s my least favorite to program on, and I agree with it the least philosophically. I use my MacBook for video editing, audio editing, photoshopping, and other graphic or A/V type stuff. Linux is awesome for embedded and server applications, but I can’t run Cubify Design on it, and I feel that the A/V apps on OS X are more matured and polished than anything available on Linux.

Linux would be my absolute favorite, but big corporations that make important pieces of software still won’t write programs for it, for some reason. In my dream universe, Microsoft would do like Apple did, and ditch their underlying operating system and .NET crap, and go with something POSIX (say, BSD) for their backend, thereby making it easier to write multi-platform software applications. They could even keep their crappy desktop look the same. But we all know they’d never, ever do that.

Hakko FX-888 soldering iron.  I do everything from SMT to soldering 4-AWG wire, all with the same tip, out of laziness, and because I can. I couldn’t even imagine having to use a crappy soldering iron.  Yet, I can’t say it makes me a snob, I’d have to have a $500 Metcal to say that.

MOS Technology 6581/8580 SID6581. I have a small collection hoarded in my closet somewhere.
I tend to gravitate towards the C-like languages, because I can pick one that suits any level of application I need.  I routinely code in C/C++ for embedded stuff, but only really use the basic object-oriented things like classes and inheritance.
I’m starting to really like Javascript, it’s so ubiquitous and useful for high-level stuff, even if it’s a decidedly evil language.  And I actually really like the concepts and paradigm of Java, even if it never seemed to work well in practice.  I don’t really like Python even though I use it occasionally (the tabs and general treatment of whitespace bugs me).  I also have an aversion to Perl, Lisp, Ruby, Haskell, Clojure, etc.  Not because they’re bad. But because I don’t have the time to understand them, and they make the open source software ecosystem a fragmented mess.

  •  Create an open-source micro-factory, capable of creating amazing things locally and sustainably.. Ideally this is what Karl and I hope FirePick will evolve into.  We see this as the logical progression of 3D fuse-filament printing, 3D metal printing, laser cutting, and SMT component assembly.  If we can make it profitable for companies to at least make prototypes and small runs in America (or pretty much any other country for that matter), rather than everything coming from China, then we can say that we’ve done something truly empowering.
  • 2000px-HAL9000.svg
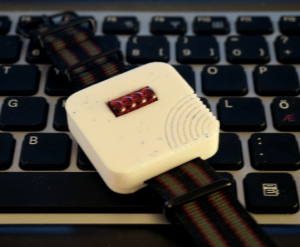
“Hard” Artificial Intelligence (as opposed to the status quo “soft” AI).   When I was a kid, I dreamed of pioneering in this field.  Google claims to be working on this sort of stuff.  These days, I’d be happy to be a cog in the wheel of some grand decades-long project to accomplish true AI.
  •  I have to at some point finish a few pointless projects that I put off to work on this project… If I get the pick and place working well, then these will be a slam dunk.  I want to finish my Nixie Tube wrist watch, that uses some Burroughs B-4998 tubes, aka, the smallest Nixie tubes in the world.  Second, I want to make a really tiny robot (40mm x 40mm) with two wheels and a camera, that can sort a pile of M&Ms by color.  Hopefully with a powerful ARM processor and lots of sensors, running SLAM technique, kalman filtering, etc.  Third is a telepresence robot with two robotic arms and gimbal stereo vision on a segway syle inverted pendulum, controlled with a LEAP motion controller and an Oculus Rift.  Then I could just mail my artificial self around the world and see cool places, and get to interact with stuff, while staying on schedule.

I would say that almost all DIY pick and place machines were created by someone who had to manually place lots of SMT components onto circuit boards, all by hand, probably with tweezers and a microscope if they were lucky.  Most people find the process of doing it by hand very tedious.  Many of them, myself included, have decided to engineer their way out of the problem by building some sort of homebrew machine to make the process faster and less error-prone.  I’ve seen countless DIY pick and place machines, both manual and automatic, on the front page of Hackaday over the years.  They all shared a common idea and problem, and most of them shared a similar fate.  The DIY machines were never completed, because the people who built them were smart and busy with whatever project they needed the placement machine for. The problem was that the their DIY machine was just a means to an end, it was never an end goal for them. That’s where our machine differs.  FirePick Delta is our only project, that we plan on working on for many years to come.  We plan on refining it, and adding new SMT component feeders and other modular tools.  And eventually, if everything works out, we’ll probably make the world’s first open-source SMT assembly line, with reflow ovens, conveyor belts, and stencil printers, all released under open source HW and SW licenses.
I’ve actually had the idea to use a delta mechanism for pick and place applications since some time around 2003, but didn’t have the manufacturing resources to build it.  Around January 2014, a friend from a DIY forum asked me if I wanted to borrow and put together a kit for a RepRap Huxley 3D printer.  I built it in a weekend, and quickly built five Prusa Mendel i2’s on it. One of those Prusa i2’s printed parts for my FirePick Delta prototype, which will hopefully print other FirePick Deltas one day.  It’s incredibly cool when you think that the little eMaker Huxley was actually printed from other machines, that were printed from machines, that trace their way back to the first Darwin 3D printer, invented by Adrian Bowyer… which was itself printed from a Stratasys in Bath University, UK.  So the hundreds and/or thousands of machines that I’ll be building over the next few years can all trace their heritage back to the original Darwin (the eMaker came with a certificate and everything, so I’ll likely have certificates for mine as well).  The ideas of robots making robots intrigues me.  They sort of have a pedigree, which is really neat.
Anyway, I had just assembled the first prototype of the FirePick Delta (back then codenamed Project Bismuth), about a day or two before the Hackaday Prize was announced.  I was probably one of the first people to create a project after the contest was announced, because i remember frantically typing it out that night.  The timing couldn’t have been better.  We had always intended to keep it open source, but entering it for the Hackaday Prize sure has forced us to do the dirty documentation work that no one ever does.  Kudos for having a requirement to do a system-level diagram.  That’s one thing that I’ve rarely seen from an open source hardware project, but is sorely needed.
I could use some advice on where to find a good web app developer with node.js, Bootstrap, AngularJS, and Express skills, that would work for free and has lots of time to devote :)  We had originally intended to have our html5 gui for the pick and place machine completed by now, but we didn’t take into account was how hard web app development really is, and how few people out there really have a mastery of it.  We’re stuck with a Java Swing UI instead, for the PnP functionality :(

I was really intrigued by the metal 3D printer that was one of the first projects to be tagged with TheHackadayPrize.  I think it would have required a crazy amount of metallurgy skills to pull off successfully, and I’m not sure they had said skills, but the concept was still really cool.

We actually have an incredibly complicated project, compared to say, OpenMV (which we love by the way).  We’ve had problems with our delta arm linkages, backlash / accuracy problems, Hierarchical BOM generation, and feeder problems.  However, we’ve got some really innovative ways to mitigate them that will hopefully be documented on our site by the Sept 29th milestone.  We’d be a month further along if we didn’t have hundreds/thousands of BOM items to document, so, uh, thanks for making us do all of that :)

Thanks to the FirePick Delta core team, and all the people who skulled our project and believe in our idea.  You guys rock.


Filed under: 3d Printer hacks, The Hackaday Prize

Piezo Vacuum Pump for Lightweight Pick and Place

$
0
0

sucks If you’re building a pick and place machine, or even just a vacuum pen, you’ll need some way to pick up tiny part. This means something that sucks, aquarium tubing, and everything that goes with that. A few months ago, [Wayne] found an interesting device called a Micro Blower that will blow small amounts of air from a small, lightweight device. A few modifications later, and he had a piezoelectric vacuum pump for picking up tiny parts.

The Micro Blower [Wayne] found is available on Mouser for about $45, but this device blows. To turn it into something that sucks, he would need to find a way to block up the input side of the pump so it could draw a vacuum. Eventually settling on mounting the blower inside a stack of foam board, [Wanye] glued on a 20 gauge needle and was able to suck up 0603 SMD parts.

The new piezoelectric sucker is extremely light, and the power draw is very reasonable: 18V and 20mA. This would be a great device to mount to a certain pick and place machine without having to run vacuum lines through the mechanics of a motion platform. Video below.


Filed under: tool hacks

3D Printed SMD Tool

$
0
0

We’ve seen pick and place tools in the form of tweezers, mechanical pencils adapted to aquarium pumps, but never as a 3D printed tool optimized for standard blunt-nose needles in a comfortable, ergonomic shape.

[Zapta] created this 3D printed SMD hand picker to populate a few boards. The tool is mostly 3D printed parts that come together for an airtight enclosure. The needles are the standard eBay affair, with the smallest he could find easily lifting 0402 and 0603 components from their tape reel. There’s also the option to switch over to larger needles for bigger components.

There are files available for two versions of this vacuum picker – one with a hole in the handle for those of us who would rather connect this thing directly to a modified aquarium pump, and one for the geniuses among us who use a foot pedal and pneumatic valve to release the tiny part. Other than the pump, the only a few bits of tubing are required to turn this bit of 3D printed plastic into a useful tool.


Filed under: 3d Printer hacks, tool hacks

Towards A Tiny Pick And Place Head

$
0
0

One of the projects that has been on [Peter Jansen]’s build list for a long time – besides a fully functioning tricorder, of course – is a pick and place machine. It’s a project born out of necessity; each tricorder takes four days to assemble, and assembling the motherboard takes eight hours with a soldering iron and hot air gun. The pick and place machine isn’t complete yet, but one vital component – the vacuum head for picking up components – is getting there with the help of some odd components.

A few months ago, [Peter] saw a post on Hackaday about repurposing a tiny piezo micro blower for use as an extremely small vacuum pen. The original build was extremely simple – just a few pieces of foam board and a power supply, but the potential was there. A tiny electric air pump that’s able to pick up large chips and modules along with tiny resistors without having to run a hose through the mechanics of a CNC gantry is a godsend.

[Peter] got his hands on one of these micro blowers and started work on a proper tool head for a pick and place machine. A port on the micro blower was covered so it would suck instead of blow, the vacuum port was threaded through a stepper motor with a hollow shaft, and a fine tip was attached to the end.

What can this vacuum head pick up? 0604 size resistors aren’t a problem, but larger modules are simply too heavy. It looks like this micro blower would only be able to pick up small components. There are other options, though: [Grant Trebbin] has had some luck with a larger pump from Sparkfun, but this requires a vacuum line to run through a CNC gantry. There’s still some work to do before a small vacuum head shows up on the tool head of a pick and place machine, but given how long it takes [Peter] to put together a single tricorder, it’s well worth investing the time to do this right.


Filed under: cnc hacks, parts

DIY SMD Twofer: Manual Pick-and-Place and the Beak

$
0
0

Populating a board with tiny SMT parts can be really tricky, and we’ll take all the help we can get. If you’re in the same boat, [vpapanik] has two devices you should check out.

First up is the manual pick-and-place machine. Wait, what? A manual pick-and-place? It’s essentially an un-driven 2-axis machine with a suction tip and USB inspection microscope on the stage. The picker apparatus is the “standard” needle-plus-aquarium-pump design, and the rails are made from angle aluminum and skateboard bearings.

Yeah, yeah, yeah. It’s not a robot. But sometimes the right jig or tool makes all the difference between a manual procedure being fiddly and being graceful. And we couldn’t help but laugh at the part in the video where he demonstrates the “machine” moving in a circular pattern.

The SMD Beak is just a weight for holding down SMT parts as you hand-solder them in place, but it’s beautiful. The round base means it’ll always push downwards, and the weight up top provides the force. The thin point will work even for 0402 parts. It’s a great design, doing exactly what’s needed and nothing more. (We use one arm of a helping hand precariously perched on its side, which now looks really crappy in comparison.)

All in all, two great ideas for making your work with SMT parts more precise and comfortable.

Thanks [RasmusB] for the tip!


Filed under: misc hacks, tool hacks

A DIY Pick and Place You Can Build Right Now

$
0
0

There have been quite a few DIY pick and place projects popping up recently, but most of them are limited to conceptual designs or just partially working prototypes. [Juha] wrote in to let us know about his project, LitePlacer, which is a fully functional DIY pick and place machine with working vision that can actually import BOMs and place parts as small as 0402 with pretty good accuracy.

LitePlacer UIWhile some other DIY pick and place setups we’ve featured use fairly exotic setups like delta bots, this machine is built around typical grooved bearings and extruded aluminum. The end effector includes a rotating vacuum tip and a camera mounted alongside the tip. The camera provides feedback for locating fiducials and for finding the position of parts. Instead of using feeders for his machine, [Juha] opted to pick parts directly from pieces of cut tape. While this might be inconvenient if you’re placing large quantities of a single part, it helps keep the design simple.

The software that runs the machine is pretty sophisticated. After a bit of configuration it’s able to import a BOM with X/Y information and start placing within seconds. It also uses the camera to calibrate the needle, measure the PCB  using the fiducials, and pinpoint the location of cut tape sections.

If you want to build your own machine, [Juha] published detailed instructions that walk you through the entire assembly process. He’s also selling a kit of parts if you don’t want to source everything yourself. Check out the video after the break to see the machine import a BOM and place some parts (all the way down to 0402).


Filed under: misc hacks, tool hacks

It Sucks to Pick Up the Pieces

$
0
0

Jigsaw puzzles are a fun and interactive way to spend an afternoon or twelve, depending on the piece count and your skill level. It’s exciting to find the pieces you need to complete a section or link two areas together, but if you have poor dexterity, excitement can turn to frustration when you move to pick them up. [thomasgruwez] had the disabled and otherwise fumble-fingered in mind when he created this pick and place jigsaw puzzle aid, which uses suction to pick up and transport puzzle pieces.

The suction comes from an aquarium pump running in reverse, a hack we’ve seen often which [thomasgruwez] explains in a separate Instructable. A large, inviting push button is wired in line to turn the pump on and off. An equally large and inviting momentary switch turns off the vacuum temporarily so the piece can be placed.

At the business end of this hack is the tiny suction-cupped tip from a cheap vacuum pen. To interface the pen head with the pump, [thomasgruwez] designed and printed a rigid straw to bridge the gap. With utility already in mind, [thomasgruwez] also designed a ring that can be bolted to the straw to house a steadying finger of your choice, like the pinkie hook on a pair of barbers’ shears.

Our favorite part of this hack has to be the optional accessory—a tiny platform for quickly flipping pieces without cutting the vacuum. Check it out after the break.


Filed under: lifehacks

Hackaday Prize Semifinalist: CNC Becomes Pick and Place

$
0
0

In the 80s and 90s, building a professional quality PCB was an expensive proposition. Even if you could afford a few panels of your latest board, putting components on it was another expensive process. Now, we have cheap PCBs, toaster-based solder ovens, and everything else to make cheap finished boards except for pick and place machines. ProtoVoltaics’ semifinalist entry for the Hackaday Prize is the answer to this problem. They’re taking a cheap, off-the-shelf CNC machine and turning it into a pick and place machine that would be a welcome addition to any hackerspace or well-equipped garage workshop.

Instead of building their own Cartesian robot, ProtoVoltaics is building their pick and place around an X-Carve, a CNC router that can be built for about $1000 USD. To this platform, ProtoVoltaics is adding all the mechanics and intelligence to turn a few webcams and a CNC machine into a proper pick and place machine.

Among the additions to the X-Carve is a new tool head that is able to suck parts out of a reel and spit them down on a blob of solder paste. The webcams are monitored by software which includes CUDA-accelerated computer vision.

Of course a pick and place machine isn’t that useful without feeders, and for that, ProtoVoltaics built their own open source feeders. Put all of these elements together, and you have a machine that’s capable of placing up to 1000 components per hour; more than enough for any small-scale production, and enough for some fairly large runs of real products.

You can check out some of the videos for the project below.

The 2015 Hackaday Prize is sponsored by:


Filed under: The Hackaday Prize

Tools of the Trade – Component Placing

$
0
0

Recently we started a series on the components used to assemble a circuit board. The first issue was on dispensing solder paste. Moving down the assembly line, with the paste already on the board, the next step is getting the components onto the PCB. We’re just going to address SMT components in this issue, because the through hole assembly doesn’t take place until after the SMT components have gone through the process to affix them to the board.

Reels!
Reels!

SMT components will come in reels. These reels are paper or plastic with a clear plastic strip on top, and a reel typically has a few thousand components on it. Economies of scale really kick in with reels, especially passives. If you order SMT resistors in quantities of 1-10, they’re usually $.10 each. If you order a reel of 5000, it’s usually about $5 for the reel. It is cheaper to purchase a reel of 10 kOhm 0603 resistors and never have to order them again in your life than it is to order a few at a time. Plus the reel can be used on many pick-and-place machines, but the cut tape is often too short to use in automated processes.

The point of the reel is that it will go through a pick-and-place machine, which is a machine that uses a vacuum syringe to pick up the part and place it in the right spot, then advance the reel and repeat. In theory this is straightforward. In practice, there are a billion little details that make a huge difference in reliability. Things like the tension of the clear strip, which must be just right so that it doesn’t leave slack but doesn’t pull the reel out. Or the adhesiveness of the strip can be a problem, too. We had one reel that started off jumpy; the adhesive was too strong, so the tape tensioner struggled to pull the tap off the reel, and it would do it in such a manner that the newly exposed component would twitch and sometimes jump out of the reel, leading the vacuum to try to pick up a missing part and stall. After a while the humidity made the tape adhesive looser and the problem went away. Every day running the line can be different for each reel, so keeping everything tuned is a constant battle. Most of the time the reels will come in sealed packages because humidity has a huge effect on the reels and the components in them (especially their connections).

Some components come in tubes because they are inconvenient for reels. This is surprisingly not a problem, as many pick-and-place machines have attachments that hold the tube at an angle and have mechanical shakers that make the parts slide out one at a time. But we’ll ignore that for now.

So you have a box of reels and cut tape (the term used for a cut strip off of a reel, if you don’t order the full reel), and you have a PCB with solder paste on it, slowly warming up. How do you get the components onto the PCB?

Tweezers

In small volumes, usually with good old tweezers. You do not want to use the ones in the bathroom vanity, as solder paste usually has lead in it and you don’t want to make anyone angry or poisoned. Get a nice set of very fine tipped tweezers.

Manual pick and place with tweezers and fingers

It turns out it’s possible to go with tweezers for medium volumes as well. In the first year of production, 3,000 units of a product that I developed were assembled by hand, each with roughly five SMT components. It turned out that at that volume, hiring high school kids at slightly higher than the local burger joint rate gave us lots of manufacturing flexibility, and gave the kids a decent wage at whatever hours they wanted, in a relevant field to their interests, and ended up being cheaper than the quotes we got from China.

The good news is that manual placement can get away with being pretty sloppy. When the PCB goes through the process of reflow, there are some neat chemical and mechanical processes that take place that align everything just right, so that the exact placement of the components isn’t critical. Essentially, the solder will melt and flow onto the pads and off of the solder mask, and any component will float on this and the flux and self-align. Still, all the connections of a component must be touching the solder paste, or else they won’t align properly.

Vacuum

vacuum-tweezer-quick-easy-cheapWhen you are doing a bunch of boards that have a lot of components, it can quickly get tiring to place all the components by hand. One method of making it easier is the vacuum tip instead of tweezers. The idea here is to get an aquarium pump and set its direction so it is sucking. Then put a syringe on the end of a tube and put a small hole where the thumb will be. Now when you put the finger over the hole, the syringe needle will suck up a part. Move the part to your destination and release your thumb and the vacuum seal will be broken, releasing the part onto the PCB. This is good for pulling the part directly out of the tape where tweezers can’t reach. We’ve covered a few of these aquarium pump pick-and-place builds over the years.

Semi-Automatic Pick and Place

protoplace_s_280 The next step is a strange hybrid between man and machine. It’s a contraption that holds the PCB in place and has a hand rest that moves on linear rail in the X and Y directions, and sometimes has a vacuum needle as well, and trays for reels or loose components. It doesn’t have any brains; those are provided by the operator. The operator can rest their hand on the moving pad as they direct it to go pick up a part, then move to place it. It just alleviates the physical burden on the person doing the component placement, but doesn’t really save much time. It’s hard to think of a good use case for this level of machine, though. Maybe a shop where they have to assemble small batches of different boards? Definitely not for high volume production of one board.

Automated Pick and Place

The TM220A, a low-end pick-and-place.

Unless your budget is in the $3,000+ range, you may never get to use one of these. This is a device with an automated gantry and a vacuum needle as well as a tray of reels. It reads a special file which details which components are on which reel, and which XY and rotation coordinates to place them. There are a lot of features to look out for. First is CPH, which is how many components it can place in an hour. Usually you’ll see numbers in the thousands, with the more expensive ones getting into the tens of thousands. They accomplish this with multiple nozzles, so the head will move over to the reels and pick up more than one component, then move over to the board and place a few components at a time.

pick-and-place machines

Another important number is how many reels the machine can support. If you are developing a product that requires 30 unique components but the pick-and-place can only do 25, then you’re looking at either needing two machines, or doing a few runs of boards with 25, then changing out the reels and putting those boards through again for the other 5 reels, then hopefully getting them through the oven intact. It’s much better to design your board to use as few unique components as possible (if you have a 10k resistor elsewhere, do you REALLY need the 4.7k, or can you get away with a 10k there instead?), or make sure you get a pick-and-place that can handle the number of reels needed. On the big fancy assembly lines, each machine has a hole in either side with conveyors, so that a PCB goes in one machine on the left, processed, then out on the right. This allows for a completely automated line, and the possibility of having two pick-and-place machines stacked together so the number of reels is not a limitation.

Some have machine vision, too. That allows the machine to automatically correct for slight deviations either in the PCB (if there is any slop in the alignment holes) or in the picking of the part (sometimes if a heavy part is rotated 270 degrees, the momentum of the rotation will cause it to over rotate, or the movement of the head will cause the part to shift slightly). This is especially good for BGA or fine pitch components, where perfect placement is crucial.

There is a company called VisionBot making a pick-and-place and launching soon on Kickstarter. They may be worth watching.

Open Source Pick and Place

This has been attempted, but there are so many challenges in these machines, and such small demand from the community, that progress is slow. OpenPnP is the community around this. There’s also a fine Hackaday.io project building a DIY pick-and-place, and another one was a semifinalist in the 2015 Hackaday Prize that converted a CNC gantry.

3D Printer Gantries

The business end of Firepick Delta

The idea here was to use the same technology that has been used with 3D printers to pick up and place components on the PCB. A camera is used to identify where the cut tape is and where the PCB is, and a process aligns the cut tape with the appropriate component designation, and then the machine is off on its own using the computer vision to identify where it needs to pick up and place each component. This is particularly suited for one-off or really low numbers of boards. They can’t advance reels, and everything must fit within the reach of the head, so board size is limited and number of components is limited. FirePick Delta is one such example.

Placing components should not be a thing that prevents you from diving into SMT PCBs. Tweezers are perfectly fine for 0402 components even for novices, but there are also machines to aid in placement from the cheap-and-rough up to the high volume super fancy mass production, and some options in between for small and medium volumes of startup-type basement production.


Filed under: Engineering, Hackaday Columns, slider, tool hacks

Creo Arm Might be the SCARA You’re Looking For

$
0
0

A SCARA (Selective Compliance Assembly Robot Arm) is a type of articulated robot arm first developed in the early ’80s for use in industrial assembly and production applications. All robotics designs have their strengths and their weaknesses, and the SCARA layout was designed to be rigid in the Z axis, while allowing for flexibility in the X and Y axes. This design lends itself well to tasks where quick and flexible horizontal movement is needed, but vertical strength and rigidity is also necessary.

This is in contrast to other designs, such as fully articulated arms (which need to rotate to reach into tight spots) and cartesian overhead-gantry types (like in a CNC mill), which require a lot of rigidity in every axis. SCARA robots are particularly useful for pick-and-place tasks, as well as a wide range of fabrication jobs that aren’t subjected to the stress of side-loading, like plasma cutting or welding. Unfortunately, industrial-quality SCARA arms aren’t exactly cheap or readily available to the hobbyist; but, that might just be changing soon with the Creo Arm.

Slated to go on the market soon as a fully assembled unit, the Creo Arm will also be released as an open source design that you can build yourself. The creator of this SCARA robot, [anfroholic], says the fully assembled production version should retail for less than $4,000. And that’s for an arm that has a claimed positional repeatability of .03mm at a distance of 600mm. Current documentation is fairly sparse, but [anfroholic] has a number of videos showcasing the different functions he has developed, which serves as a nice proof of concept.

Curious about what you can do with a SCARA robot? Check out some of our previous articles on 3D printing with a SCARA, and using one for pick and place tasks.


Filed under: robots hacks

Maker Faire NY: Chipsetter, The Pick And Place For Your Production

$
0
0

This weekend at Maker Faire, Chipsetter showed off their pick and place machine. It is, in my opinion, the first pick and place machine designed for hackerspaces, design labs, engineering departments, and prototypers in mind. It’s not designed to do everything, but it is designed to everything these places would need, and is much more affordable than the standard, low-end Chinese pick and place machine.

Inexpensive and DIY pick and place machines are familiar territory for us. A few years ago, we saw the Carbide Labs pick and place machine, a machine that allows you to put a board anywhere, pull chips out of tape, and place them on pasted pads. The Retro Populator is a pick and place machine that retrofits onto a 3d printer. The Firepick Delta, another Hackaday Prize project, takes a mini-factory to its logical conclusion and is capable of 3D printing, populating boards, dispensing paste, and creating its own circuit boards. All of these machines have one peculiarity: they are entirely unlike normal, standard, industrial pick and place machines.

The Chipmaker feeder. Production versions of this feeder will be injection-molded plastic. This one is SLA nylon.

The idea of any startup is to build a minimum product, and the idea behind Chipsetter is to build a minimally viable tool. For their market, that means being able to place 0402 components (although it can do 0201, the team says the reliability of very small packages isn’t up to their standards), it means being able to shoot 1250 components per hour, and it must have inexpensive feeders to accept standard tape.

This is a complete departure from the spec sheet of a machine from Manncorp. For the ‘professional’ machines, a single feeder can cost hundreds of dollars. According to Chipsetter founder Alan Sawula, the feeders for this machine will hopefully, eventually cost about $50. That’s almost cheap enough to keep your parts on the feeder. A pro machine can handle 01005 components, but 0402 is good enough for most projects and products.

This is the closest I’ve seen to a pick and place machine designed to bridge the gap between contract manufacturers and hackerspaces. Most of the audience of Hackaday – at least as far as we’re aware – doesn’t have the funds to outsource all their manufacturing to a contract manufacturer. Most of the audience of Hackaday, though, or any hackerspace, could conceivably buy a Chipsetter. The Chipsetter isn’t designed to be the best, but when it comes to placing parts on paste, the best is overkill by a large margin.

The Chipsetter has a Kickstarter going right now. They’re about halfway funded, with a little more than three weeks to go. Right now, if you’re looking at pick and place machines, I’d highly suggest checking out the Chipsetter. It works, and with forty feeders it’s cheaper and more capable than the lowest priced ‘pro’ machines.


Filed under: Crowd Funding

Ottawa Maker Faire: Droids And Pick And Place Machines

$
0
0

Three things that I love about participating in Maker Faires are seeing all the awesome stuff people have done over the past year, spending time with all my maker friends in one big room over two days and the reactions to what I made. The 2016 Ottawa Maker Faire had all this in spades.

BB-8 – Droid With Magnetic Personality

Explaining BB-8 at the Ottawa Maker Faire My BB-8 droid

There’s just something about BB-8 that touches people. I once heard of a study that showed that when buying kid’s toys, adults were attracted to circles, that that’s the reason teddy bears often have round heads with big round eyes. Similar reactions seem to happen with BB-8, the droid from last year’s Star Wars movie. Adults and kids alike pet him, talk baby-talk to him, and call to him with delight in their voice. I got those reactions all throughout the Maker Faire.

But my favorite reaction happened every time I removed the head and lifted the top hemisphere of the ball to expose the electronics inside. Without fail the reaction of adults was one of surprise. I don’t know if it was because of the complexity of the mechanism that was revealed or because it was just more than they expected. To those whom I thought would understand, I gave the same speech:

“This is the remote control receiver taken from a toy truck, which puts out negative and positive voltages for the different directions. That goes to this ugly hack of a board I came up with that converts it all to positive voltages for the Arduino. The Arduino then does pulse width modulation to these H-bridge driver boards, for speed control, which then talk to these two drill motors.”

Bowie and BB-8
Bowie and BB-8

Those I wasn’t sure would understand were given a simpler overview. Mine’s a hamster drive (we previously covered all the possible ways to drive a BB-8) and so I showed how it sits on two Rollerblade wheels inside the ball. I then flipped it over to show the heavy drill batteries underneath, and then explained how the magnets at the top of the drive mechanism attracted the magnets under the head, which got another look of revelation. All went away satisfied.

But BB-8 sometimes needs a break from human interaction and seeks out its own kind, like Bowie which you can read about below along with more awesome Maker Faire exhibits.

Bowie – Shoreline Cleaning Robot

Bowie - shoreline cleaning robot Bowie - shoreline cleaning robot

Bowie is the creation of RobotMissions.org, the brainchild of [Erin], aka RobotGrrl. Its mission in life is to clean up garbage from shorelines. RobotMissions has been at it for almost a year now, has done multiple field tests and collected just over $10,000 from a kickstarter campaign. Currently Bowie is remote-controlled but there’s a mounting spot for a camera for vision and other sensors for eventual semi-autonomous operation. It’s 3D printed and the files are online for anyone else to experiment with. We’re also delighted that RobotMissions is entered in this year’s Hackaday prize.

SONIA – Autonomous Underwater Vehicle

S.O.N.I.A. - underwater autonomous vehicle S.O.N.I.A. - underwater autonomous vehicle

And while on the topic of autonomy in vehicles, located at a nearby booth was S.O.N.I.A., an underwater autonomous vehicle built by undergraduate students. It’s undergone 8 prototypes since 1999, competing in the annual Robosub competition in San Diego. With a maximum depth of 30 meters, it’s capable of 70 minutes of autonomy, mapping and navigating its environment using sonar and cameras.

And if you look closely at the base of the vehicle in the photos above you’ll notice some red torpedoes. Those are fired using compressed air from a part that wasn’t attached during the Faire, so we’re not sure if they are used in the competitions. But we think they’re a must-have anyway.

Carleton CanSat

Carleton CanSat deployment

Two teams from Carleton University are competing in the CanSat competition which involves a payload being rocketed to 700 meters where a cylinder (the ‘can’ in CanSat) containing their project is released. It floats by parachute down to 400 meters where their project is deployed. Their project then has to glide down the rest of the way in a circular pattern with a diameter less than 1000 meters. On the way down they have to sample and transmit back air pressure, temperature, and using a magnetometer and a pitot tube, the heading and speed.  The teams made all the necessary electronics boards from scratch.

Carleton CanSat electronics Bladed Carleton CanSat

One team’s implementation is a winged glider with the electronics located between the wings. The other team uses helicopter style blades that autorotate using the air flowing up through the blades as it falls, slowing the descent. But this would cause everything below the blades to counterrotate and interfere with some of the sensors. To prevent that they added a motor lower down that counterrotates everything relative to the blades.

Merge Conflict Team 2706 – Robot Warriors

A Merge Conflict robot throwing a ball One of Merge Conflict's robots

Merge Conflict is a community organization made up of 25 high school and grade 8 students and industry mentors who build a robot within 6 weeks to compete in the FIRST Robotics Competition. FIRST is an international organization founded by Dean Kamon of Segway fame. In the competition the robots compete in a challenging field game.

2016’s game was called FIRST Stronghold and involved breaching castle defenses (overcome obstacles), throwing rocks (balls) into castles, blocking other robots, and even scaling the castle wherein robots actually lift themselves to a specific height up castle’s wall. For the first fifteen seconds the robots are autonomous and are teleoperated for the remaining two minutes and fifteen seconds.

Merge Conflict’s robot was one that breaches castle defenses, sometimes practically flying over them as you can see in the video below (21 seconds in), and throws balls into the castles. It could accomplish all that autonomously around 85% of the time, an impressive achievement.

Chipsetter – Affordable Pick And Place Machine

Chipsetter pick and place machine

Chipsetter is a pick and place machine designed and priced for hackerspaces, design labs and engineering departments. [Brian Benchoff] covered it recently while they were at the New York Maker Faire and this was my turn to see it in action.

I watched a demonstration of the full process where at one table they first applied paste to their boards using a template that was purchased from the same fabricator that made the boards. They positioned the boards in the Chipsetter machine and it picked LEDs and resistors from feeders and placed them precisely on the paste on the boards. Since the machine relies on vision to line up with the boards, a cover a was lowered during the process that not only blocked most incoming light but also prevented filming while it was running (in hindsight, I could have left the camera inside the machine itself). After that the board was returned to the other table for reflow and soldering on of a battery clip.

To be honest, this is my only experience with a pick and place machine but we have a number of people in town who regularly make electronic badges for events and other wearable electronics in large quantities who would benefit from one of our hackerspaces having one of these.

R2D2 Builders Club

BB-8 visiting R2-D2 R2-D2 Builders Club

And before the Faire ended, my BB-8 couldn’t resist visiting the R2-D2 droids built by members of the R2-D2 Builders Club. Club members were out in force with three R2 units, a completed static BB-8 with a drawer panel that opens, and a BB-8 still in progress. If you’re looking to build one of these R2 units, or other astromech droids, then there’s no better place to start than at Astromech.net where you’ll find blueprints, details on electronics and a helpful forum.

Til Next Year

And so ended the Faire. BB-8 and I packed up our table and rolled on out until next year.


Filed under: cons

A DIY Vacuum Pickup Tool for $75

$
0
0

If you’re assembling prototypes of SMD boards on your own, placing the parts accurately can be a pain. Of course, it’d be nice to have a full pick and place machine, but those are rather expensive and time consuming to set up, especially for a small run of boards. Instead, a vacuum pickup tool can help you place the parts quickly and accurately by hand.

The folks over at Ohmnilabs have put together their own DIY pickup tool for about $75, and it’s become part of their in-house prototyping process. They grew tired of placing components with tweezers, which require you to remove parts from the tape before lifting them, and have a tendency to flip parts over at the worst time.

The build consists of a couple parts that can be bought from Amazon. An electric vacuum pump does the sucking, and the vacuum level is regulated with an adjustable buck converter. A solid foot switch keeps your hands free, and syringe tips are used to pick the parts up.

This looks like a simple afternoon build, but if you’re prototyping, it could save you tons of time. To see it in action, check out the video after the break.


Filed under: tool hacks

[Dave’s] Not Just a Member of the Air Club for Tweezers

$
0
0

We are always surprised how much useful hacking gear is in the typical craft store. You just have to think outside the box. Need a hot air gun? Think embossing tool. A soldering iron? Check the stained glass section. Magnification gear? Sewing department.

We’ve figured out that people who deal with beads use lots of fine tools and have great storage boxes. But [Dave] found out they also use vacuum pickup tweezers. He had been shopping for a set and found that one with all the features he wanted (foot pedal, adjustable air flow, and standard tips) would run about $1000.

By picking up a pump used for bead makers and adding some components, he put together a good-looking system for about $200. You can see a video of the device, below, and there are several other videos detailing the construction.

The pickup needles use the same fitting that medical syringes use–known as a Luer lock. [Dave] provides links to all the components over on Hackaday.io. The actual build is simple enough. No Arduino, ESP8266, or Raspberry Pi. Just a foot switch and a solenoid along with a collection of tubing and fittings.

We were hoping the first video would show the finished product working, but it doesn’t. You have to skip to video 7 for that, and you can find it below. If you want to build it yourself, you’ll have to pick up the 5 videos in between.

We’ve talked about raiding craft and art stores before for lots of project help. Of course, vacuum tweezers aren’t strictly necessary. We’ve also seen cheaper builds, often based on aquarium pumps, but not always.


Filed under: tool hacks
Viewing all 66 articles
Browse latest View live


<script src="https://jsc.adskeeper.com/r/s/rssing.com.1596347.js" async> </script>